

Table of Contents
ToggleA 10×10 kitchen, 100 square feet of cooking, prepping, and storage space, is the industry standard for measuring kitchen costs and layouts. It’s compact, but far from limiting. With smart planning, the right layout configuration, and strategic storage, a 10×10 footprint can handle everything from weeknight dinners to holiday baking. The key isn’t cramming more into the space: it’s designing with intention so every square foot earns its keep. Whether renovating an existing kitchen or planning a new build, understanding how to work within these dimensions makes the difference between a cluttered box and a functional, comfortable workspace.
Key Takeaways
- A 10×10 kitchen layout with 100 square feet is the industry standard for measuring kitchen costs, requiring smart planning to balance functionality with limited space.
- L-shaped and galley configurations are the two most effective 10×10 kitchen layouts, with L-shapes maximizing corner usage and galley designs optimizing workflow in parallel wall setups.
- Vertical storage solutions like 42-inch wall cabinets, pull-out shelves, and blind corner systems can recover up to 20–50% more usable storage than standard fixed cabinets.
- Light colors, open shelving, and under-cabinet LED lighting make a 10×10 kitchen feel larger and more open while reducing visual clutter.
- Smart appliance placement and intentional design choices—avoiding unnecessary islands and overfilled open shelves—preserve traffic flow and prevent the space from feeling cramped.
Understanding the 10×10 Kitchen Footprint
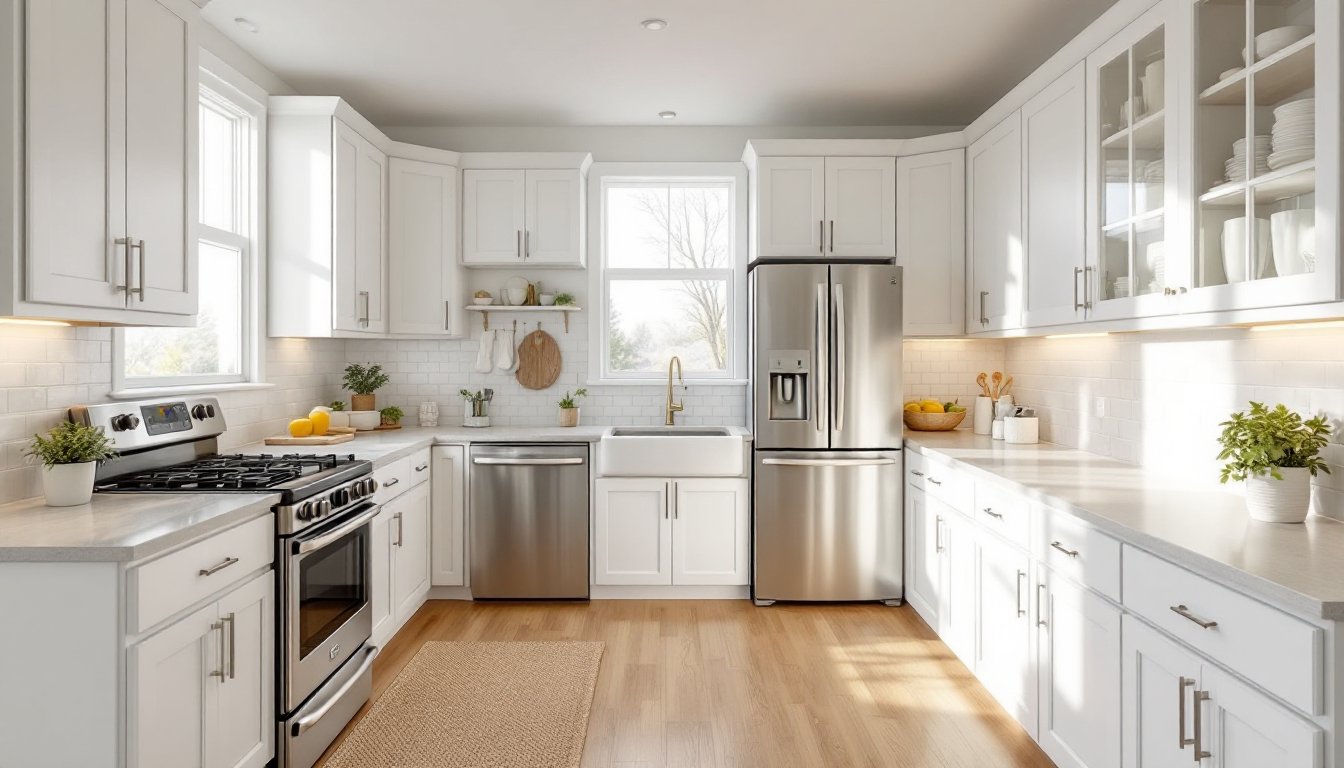
A true 10×10 kitchen measures 100 square feet, typically with walls forming a 10-foot by 10-foot square or a near-equivalent rectangle (such as 8×12.5). This footprint has become the baseline in the cabinet and remodeling industries for estimating costs, comparing layouts, and standardizing quotes.
In practical terms, 100 square feet translates to 10 linear feet of cabinetry along two walls in most configurations. That’s roughly enough space for a sink base, range cabinet, refrigerator opening, and a modest run of base and wall cabinets. The perimeter is tight, so every inch of wall and floor matters.
This size fits common scenarios: starter homes, condos, apartments, and older houses built when kitchens were less central to daily living. It’s also a popular size for accessory dwelling units (ADUs) and mother-in-law suites, where building codes often limit kitchen square footage.
Because the footprint is compact, the work triangle, the classic distance between sink, stove, and refrigerator, shrinks naturally. Ideally, the sum of the triangle’s three legs should fall between 13 and 26 feet, with no single leg shorter than 4 feet or longer than 9 feet. In a 10×10 space, the triangle tends toward the lower end of that range, which can actually improve efficiency if planned correctly. Less walking means faster meal prep, but it also means less room for error in appliance placement.
Best Layout Configurations for a 10×10 Kitchen
Choosing the right layout determines how well the kitchen functions day to day. With 100 square feet, there are two configurations that consistently deliver the best balance of counter space, storage, and workflow.
L-Shaped Layout
The L-shaped layout anchors cabinetry along two perpendicular walls, leaving the remaining space open for traffic flow or a small dining nook. This setup is the most popular choice for 10×10 kitchens because it maximizes corner usage and keeps the work triangle tight without creating a corridor.
In a typical L-configuration, one wall runs 10 feet and the adjacent wall runs another 10 feet, though dimensions can flex slightly (9 feet on one side, 11 on the other) depending on door and window placement. The corner where the two runs meet is prime real estate, and a common trouble spot. A lazy Susan cabinet or a blind corner pull-out helps reclaim that awkward, deep space that’s otherwise a black hole for lost Tupperware.
Place the sink on one leg of the L, ideally under a window if available. Position the range on the same wall or the perpendicular wall, keeping at least 15 inches of counter between the range and any adjacent wall or tall cabinet (per IRC guidelines, though local codes may vary). The refrigerator anchors the end of one leg, allowing for a logical zone: cold storage on one end, prep and cooking in the middle.
One drawback: corner cabinets eat up linear footage fast. A 36-inch corner base occupies nearly 6 feet of combined wall space but offers less usable storage than two straight-run cabinets. Budget accordingly and prioritize quality hardware for corner access.
Galley Layout
The galley layout (also called a corridor kitchen) runs cabinetry along two parallel walls with a central walkway. In a 10×10 space, this usually means two 10-foot cabinet runs facing each other, separated by a 42- to 48-inch aisle. Anything narrower feels cramped and violates most building codes for accessible design: anything wider shrinks counter depth.
Galley kitchens excel at efficiency. Everything is within arm’s reach, and there’s no wasted corner space. The work triangle compresses into a tight zigzag, which many professional kitchens favor for speed. Designers often recommend placing the sink and range on one wall, with the refrigerator and prep counter on the opposite side, though variations work depending on plumbing and electrical runs.
The main trade-off is traffic flow. If the galley has doorways at both ends, it becomes a hallway, and foot traffic disrupts cooking. If it’s closed at one end (a single-entry galley), the cook is boxed in, fine for solo work, awkward when multiple people need access. For open-plan homes, a galley may feel disconnected unless one side opens to a dining or living area.
Galley layouts also limit flexibility for islands or peninsulas. There’s simply no room. But for renters, condo owners, or anyone working within a fixed footprint, the galley delivers maximum counter and storage in minimal square footage. Many small space strategies rely on this exact configuration for urban kitchens.
Storage Solutions That Maximize Every Inch
In a 10×10 kitchen, vertical space and smart cabinet interiors matter more than square footage. Standard base cabinets stand 34.5 inches tall (36 inches with countertop), and wall cabinets typically run 30, 36, or 42 inches high. Opting for 42-inch wall cabinets that reach closer to the ceiling adds roughly 20% more storage than 30-inch units, with minimal added cost.
Install wall cabinets 18 inches above the countertop for adequate workspace clearance, though 20 inches works better if the primary cook is taller than average. The gap between the top of the wall cabinet and the ceiling often becomes wasted space, close it with a trim soffit, or use the gap for open shelving to store items used infrequently.
Pull-out shelves and drawer inserts transform base cabinets from dark caves into accessible storage. A standard 24-inch-deep base cabinet with fixed shelves forces users to crouch and dig: a pull-out shelf brings contents to the front with one motion. These retrofits cost $30 to $80 per shelf but pay off in daily convenience.
For corners, avoid static shelves. A blind corner pull-out system (brands like Rev-A-Shelf are common) uses a two-tier sliding mechanism to extract items stored deep in the L-corner. Installation requires careful measurement, most need a minimum 12-inch opening and won’t work with certain hinge placements, but they recover 50% or more of corner capacity.
Toe-kick drawers (shallow drawers installed in the recessed space beneath base cabinets) add hidden storage for flat items like baking sheets, cutting boards, or trivets. They’re an easy DIY upgrade if base cabinets are frameless and you’re comfortable with a drill and drawer slides.
Above the refrigerator, that awkward cabinet (usually 12 to 15 inches tall) is perfect for storing lightweight, seldom-used items, holiday serveware, small appliances, or bulk pantry goods. Add a pull-down shelf or a simple step stool to make access safer.
Vertical dividers inside cabinets organize sheet pans, lids, and cutting boards upright rather than stacked. A $20 set of adjustable dividers from a big-box store prevents the avalanche effect when pulling one item from the pile. Many kitchen organization tactics emphasize dividers as the simplest fix for base cabinet chaos.
Pantry space is tight in a 10×10 layout. If there’s no room for a floor-to-ceiling pantry cabinet, consider a narrow pull-out pantry (6 to 12 inches wide) that fits between the refrigerator and an adjacent wall. These tall, slim units slide out on full-extension slides and hold spices, canned goods, and oils in a compact vertical column.
Design Tips to Make Your 10×10 Kitchen Feel Larger
Physical space is fixed, but perceived space is negotiable. A few deliberate design choices can make a 10×10 kitchen feel open and breathable instead of boxed in.
Light-colored cabinetry and countertops reflect more light and visually recede, which expands the sense of space. White, off-white, pale gray, and light wood tones dominate modern small kitchen designs for this reason. Dark cabinets can work, they add drama and hide wear, but they absorb light and make walls feel closer.
Glass-front cabinet doors on a few upper cabinets break up solid runs and add depth. They work best when the contents are intentionally styled (matching dishware, glassware, or open shelving with decorative items). Frosted or seeded glass hides clutter while still providing visual relief.
Skip upper cabinets entirely on one wall if natural light is limited. Open shelving or a single floating shelf keeps sight lines clear and prevents the kitchen from feeling like a tunnel. This works especially well in galley layouts where one wall backs onto a dining or living area.
Under-cabinet LED lighting is inexpensive (plug-in strips start around $25) and transformative. It eliminates shadows on the countertop, highlights backsplash tile, and makes the kitchen feel professionally finished. Hardwired options with a wall switch or dimmer offer cleaner lines but require basic electrical work, or an electrician if you’re not confident working with household wiring.
Choose integrated or panel-ready appliances when budget allows. A dishwasher or refrigerator that matches the cabinet finish disappears into the room, reducing visual clutter. Stainless steel is fine, but a wall of mismatched appliance fronts fragments the space.
Minimal or handle-free cabinetry (using touch-latch hardware or recessed pulls) creates a streamlined look with fewer interruptions. Handles and knobs add depth and can snag clothing in tight quarters, so flat-front cabinets with push-to-open mechanisms improve both aesthetics and function.
Reflective surfaces, glossy tile backsplashes, polished countertops, or a mirrored range hood, bounce light around the room. Matte finishes absorb it. In a small kitchen, a bit of sheen goes a long way.
Finally, resist the urge to overfill the space. A 10×10 kitchen doesn’t need a island if it kills the traffic flow. It doesn’t need open shelves crammed with decor if counter space is already limited. Every element should earn its place by adding function or genuine visual value, not filling a gap out of habit.
Conclusion
A 10×10 kitchen isn’t a compromise, it’s a focused challenge. The constraints force smarter decisions: better layouts, tighter storage, cleaner design. Whether working with an L-shape, a galley, or a hybrid, the goal stays the same: build a kitchen that works hard without feeling cramped. Measure twice, plan the work triangle, invest in pull-outs and vertical storage, and don’t underestimate the power of good lighting. The space is small, but the potential isn’t.

