

Table of Contents
ToggleArt Deco wall sconces aren’t just light fixtures, they’re statement pieces that anchor a room with geometry, metallic shine, and theatrical flair. Born from the 1920s obsession with streamlined luxury, these sconces bring the same architectural boldness that defined the Chrysler Building into your hallway, bedroom, or bath. They work in historically faithful restorations and modern interiors alike, pairing equally well with subway tile or sleek minimalism. Whether you’re wiring a new build or swapping outdated brass fixtures, understanding the bones of Art Deco design will help you choose sconces that add genuine character instead of costume-party kitsch.
Key Takeaways
- Art deco wall sconces blend geometric clarity, metallic finishes, and bold symmetry to create sculptural statement pieces that work in both period homes and contemporary interiors.
- When selecting art deco wall sconces, prioritize scale proportional to your trim and door casings—aim for 6–10 inch backplates in rooms with standard 8-foot ceilings and larger fixtures in spaces with 9-foot or higher ceilings.
- Proper installation requires shutting off power at the breaker, verifying wire condition meets NEC standards, and securely fastening the electrical box to a stud or wood backer to safely support the fixture’s weight.
- LED-compatible E26 sockets make modern art deco wall sconces energy-efficient, and selecting 2700K color temperature preserves the warm, vintage-friendly glow that complements period architecture.
- Quality art deco wall sconces should carry UL or ETL certification, feature solid brass or steel construction, and include replaceable sockets—avoid cheap imports with vague certifications that pose fire hazards.
- Mounting height matters: position sconce backlates so the glass shade center sits roughly 60–66 inches from the floor for optimal light spread, and flank bathroom mirrors at eye level spaced 30–36 inches apart.
What Makes Art Deco Wall Sconces So Special?
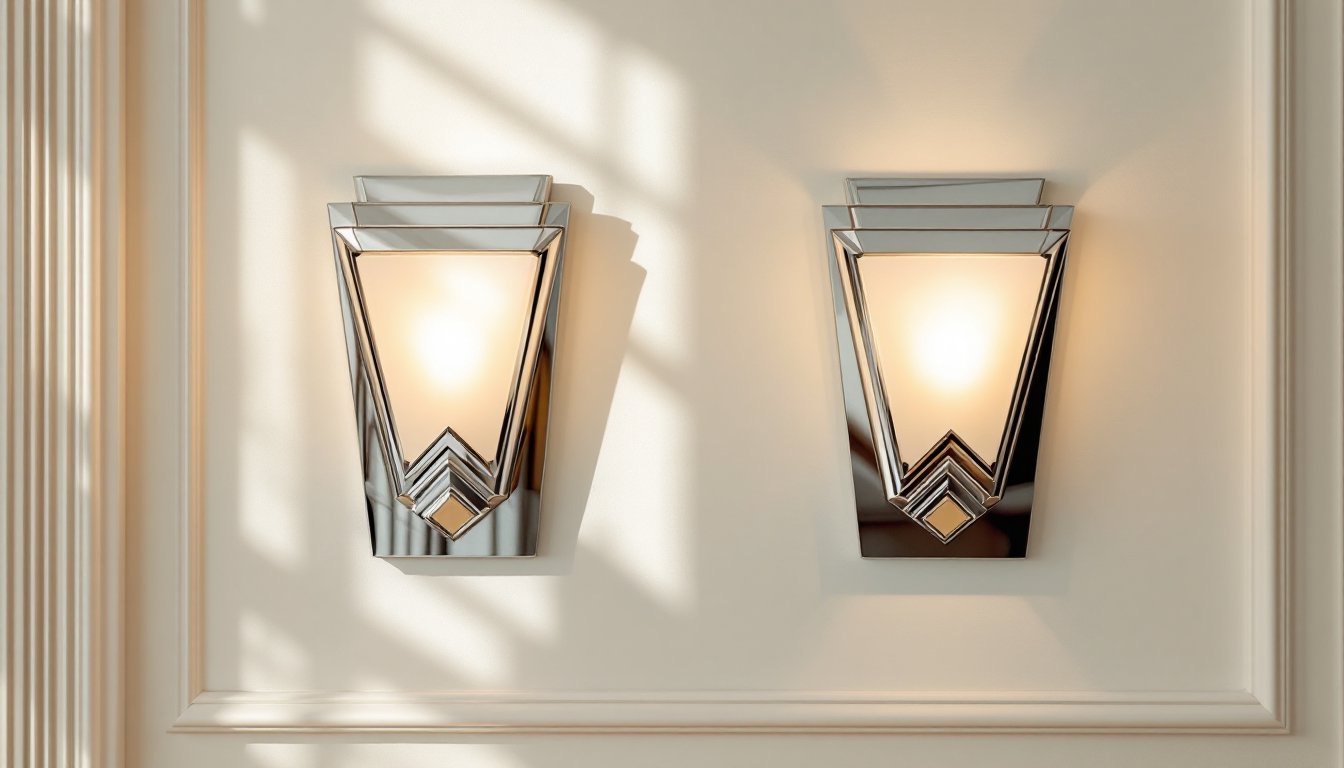
Art Deco sconces stand apart from other vintage fixtures because of their commitment to geometric clarity and industrial materials. You’ll recognize the style by hard angles, stepped forms, sunburst motifs, chevron patterns, and ziggurat silhouettes. Materials lean heavily on chrome, brass, nickel, and glass, often frosted or etched, with occasional lacquered wood or Bakelite accents in higher-end reproductions.
Unlike ornate Victorian or delicate Mid-Century fixtures, Art Deco sconces embrace symmetry and mass. They’re intentionally bold. A pair flanking a fireplace or mirror reads as architecture, not just accessory lighting. The aesthetic draws from Cubism, Egyptian revival motifs (popularized after King Tut’s tomb opened in 1922), and machine-age optimism. That blend gives sconces a sculptural weight that holds up in both period homes and contemporary spaces.
From a practical standpoint, many original and quality reproduction sconces use E26 medium-base sockets compatible with modern LED bulbs, making them energy-efficient without sacrificing the warm glow that flatters plaster walls and wood trim. If you’re working with an older fixture, verify the socket type and wiring condition before installation, some may need rewiring to meet current NEC (National Electrical Code) standards, especially if insulation is cracked or the fixture lacks a proper ground.
Popular Art Deco Wall Sconce Styles for Every Room
Geometric and Angular Designs
These are the workhorses of the Art Deco catalog. Look for sconces built around trapezoids, hexagons, and tiered rectangles. Frosted or clear glass panels sit within chrome or brass frames, often with a center backplate shaped like a fan or stepped pyramid. They’re ideal for hallways, bathrooms, and dining rooms where you want ambient lighting that doesn’t compete with artwork or cabinetry.
Mounting height matters: install the backplate so the center of the glass shade sits roughly 60–66 inches from the finished floor for optimal light spread and visual balance. In a bathroom flanking a mirror, position them at eye level or slightly above, spaced 30–36 inches apart for even illumination without harsh shadows.
Geometric sconces pair well with subway tile, board-and-batten wainscoting, and painted trim. The clean lines echo early 20th-century millwork without requiring a full period restoration. If you’re mixing eras, these designs bridge the gap between traditional trim profiles and modern furnishings better than fussier Victorian or Craftsman fixtures.
Vintage Hollywood Regency Sconces
Hollywood Regency is Art Deco’s glamorous cousin, think mirrored surfaces, lucite details, and dramatic scale. These sconces often feature candelabra-style arms with frosted torpedo or globe shades, backplates in polished nickel or antiqued gold, and occasionally crystal or glass beading. They’re statement fixtures, best reserved for powder rooms, entryways, or bedrooms where a bit of theater is welcome. The resurgence of Art Deco design in recent years has brought renewed interest in these bold, expressive pieces.
Because Regency sconces tend to be larger and heavier, confirm your wall can support the weight. Standard ½-inch drywall alone won’t cut it for fixtures over three pounds, mount the backplate into a wood stud or install a ½-inch plywood backer between the studs during rough framing. Use #8 screws at minimum, and if the sconce ships with toggles or plastic anchors, upgrade to proper wood screws or metal toggle bolts rated for the fixture’s weight.
These sconces work beautifully with jewel-toned paint (emerald, sapphire, deep plum), velvet upholstery, and high-gloss trim. They’re less suited to rustic or farmhouse aesthetics, trying to force Regency glamour into shiplap and Edison bulbs usually lands somewhere between confused and comical.
How to Choose the Right Art Deco Wall Sconces for Your Space
Start by measuring your wall space and noting the location of existing electrical boxes. If you’re replacing a fixture, the box is already there: if you’re adding sconces from scratch, you’ll need to fish wire through the wall or surface-mount conduit, depending on your wall type and local code. Permit requirements vary, some jurisdictions allow homeowner electrical work, others require a licensed electrician for anything beyond fixture swaps. Check with your local building department before cutting into walls.
Scale matters more than style. A tiny sconce on a ten-foot wall reads as an afterthought: an oversized fixture in a narrow hallway becomes a head hazard. As a rule, sconces should be proportional to the trim and door casings in the room. If your baseboards are 5–6 inches tall and door trim is 3½ inches, look for sconces with backplates in the 6–10 inch range. In rooms with taller ceilings (9 feet or more), you can go larger.
Consider light output and bulb type. Many reproduction sconces accommodate 40–60-watt incandescent equivalents. For LED retrofits, aim for 400–800 lumens per sconce depending on whether you need task lighting (bathroom vanity) or ambient glow (hallway). Color temperature also shapes the effect: 2700K gives warm, vintage-friendly light: 3000K is slightly crisper and works in modern contexts.
Finally, think about finish durability. Polished chrome and nickel show fingerprints and water spots, plan to wipe them down regularly in high-humidity bathrooms. Brushed or antiqued brass hides smudges better and ages gracefully. Powder-coated or painted finishes can chip if installed in high-traffic zones: reserve them for bedrooms and living areas.
Installation Tips and Best Practices for Wall Sconces
Before you pick up a screwdriver, shut off power at the breaker and verify it’s off with a non-contact voltage tester. Don’t rely on the wall switch alone, breakers can be mislabeled, and you don’t want to learn that the hard way.
Typical installation steps:
- Remove the old fixture (if present) and inspect the electrical box. Make sure it’s securely fastened to a stud or wood backer. Plastic “old work” boxes are code-compliant but can flex: metal boxes are sturdier for heavier sconces.
- Check wire condition. If insulation is cracked, brittle, or cloth-wrapped without a ground, call an electrician. Cloth wiring (common in pre-1950s homes) may lack a grounding conductor and require rewiring to meet current NEC Article 250 grounding requirements.
- Connect fixture wires: black to black (hot), white to white (neutral), and bare copper or green to ground. Use twist-on wire connectors rated for the wire gauge (usually 14 or 12 AWG). Wrap connections with electrical tape for extra security.
- Tuck wires carefully into the box and mount the backplate with screws provided. Don’t overtighten, stripped screw holes in drywall or plaster are a headache to fix. If the box sits proud or recessed from the wall, use box extenders or plaster rings to bring it flush.
- Attach the shade or glass panels per the manufacturer’s instructions. Many Art Deco sconces use set screws or slip-on shades: keep small parts in a cup so they don’t vanish into floor vents.
- Restore power and test. If the bulb flickers, recheck wire connections. If it doesn’t light at all, verify the switch and breaker are on, then test voltage at the fixture with a multimeter.
Safety notes: Wear safety glasses when working overhead, old plaster and paint chips love to find eyes. If you’re drilling into tile (common in bathrooms), use a carbide-tipped masonry bit and painter’s tape to prevent the bit from wandering. For installations in damp or wet locations (within 3 feet of a tub or shower), use sconces rated for damp or wet locations per NEC Article 410.
If your sconce requires dimming, confirm the bulbs are dimmable LEDs and pair them with a compatible LED dimmer switch, standard incandescent dimmers can cause buzzing or flickering.
Where to Buy Art Deco Wall Sconces in 2026
Reproductions and new production: Major lighting retailers (Rejuvenation, Schoolhouse Electric, Restoration Hardware) offer historically informed reproductions with modern wiring and UL listing. Expect to pay $150–$600 per sconce depending on size, finish, and materials. These are reliable choices if you need matching pairs and want a warranty.
Vintage and antique sources: Salvage yards, estate sales, and online marketplaces (1stDibs, Chairish, eBay) turn up original 1920s–1940s fixtures. Prices range wildly, $50 for a tarnished single to $1,200+ for rare signed pieces. Budget an additional $75–$150 per fixture for professional rewiring and restoration if the wiring is sketchy or the finish needs replating. For curated luxury home design inspiration, many designers turn to high-end auction sites and specialty dealers.
Custom fabrication: If you’re restoring a landmark property or want exact replica sconces to match existing fixtures, metal fabricators and restoration specialists can reproduce pieces from photos and measurements. This is the priciest route, often $800–$2,000+ per sconce, but it’s sometimes the only way to maintain historical accuracy in designated historic districts where design review boards have the final say. For more interior design ideas and inspiration, browsing curated galleries can help identify the right proportions and finishes for custom work.
Quality markers to look for:
- UL or ETL listing (required for insurance and code compliance in most jurisdictions)
- Solid brass or steel construction (not pot metal or thin-stamped aluminum)
- Replaceable sockets and wiring (avoid permanently molded assemblies)
- Finish warranties (reputable makers stand behind plating and powder coating)
Avoid ultra-cheap imports with vague certifications and no return policy. A $40 sconce that arrives with a cracked shade, misaligned backplate, and wiring that smells like burning plastic on first use is no bargain, it’s a fire hazard and a wasted Saturday.

